
Installation Guide
General Note About Installation Guide
The following general installation and grouting guidelines pertain to most applications for mosaic tiles. The technical service departments of major setting material companies should be consulted regarding specific installation questions.
Inspection
The end user is responsible for determining the acceptability of the product. Installation constitutes acceptance of tile order.
The handmade character of mosaic tile creates a degree of artistic variation in shade, color, tone, and size within each sheet of tile.
Open and inspect each carton of tile to confirm shading consistency. Randomly select 5 sheets from different cartons to establish color control during installation. Before installing tile, blend sheets from different cartons to assure random placement during installation. As sheets are being installed, check them against control samples prior to placing them in the setting material to assure acceptable shade variations and quality.
Installation
Bravotti's mosaics come in standard 12" x 12" sheets, individually labeled with an easy to follow corresponding installation guide, for a simple installation.
Installation Notes
- This is intended only as a quick reference to the basics of tile installation.
- Tape is adhered to the front face of the mosaic sheets. Do not install this side into the setting material.
- Carefully read all instructions before starting installation.
- Please read and follow all specific installation products guidelines and specifications.
- Installation should be performed in air temperatures between 41oF minimum and 86oF maximum.
- Remember the space between sheets should equal the space between tiles.
Installation Preparation & Substrate Information
- Carefully assess the installation surface remembering that different substrates can require different preparation.
- Installation surface should be a smooth uniform plane. Installation on a highly varied surface will be difficult and may cause undesirable results. Scored drywall of newly-built wall preferred substrate.
- For newly-built wall applications, the walls drywall is an adequate substrate to receive the mosaic.
- For existing wall or floor applications where the surface is structurally questionable or has a highly varied plane that will compromise the mosaic installation, add a layer of backer board, such as Durock, to serve as the substrate to receive the mosaic.
- If possible, dry fit mosaic sheets and inspect before installing.
Installation Process
Skimming
- The installation surface must be smooth and clean to ensure proper installation.
- It may be necessary to lay a thin layer of setting material on the surface to ensure that it is ready for the tile.
- Allow 12 hours to dry if layer of setting material is needed.
NOTE: A waterproofing/anti-fracture membrane needs to be applied to the uniform surface if the mosaic is to be submerged in water, or if anti-fracture or crack isolation properties are necessary. This typically consists of rolling or spraying a liquid, rubber membrane onto the uniform surface prior to mosaic installation.
Guide Lines

- Measure the space in which the mosaic is being installed to determine the best fit for your tile.
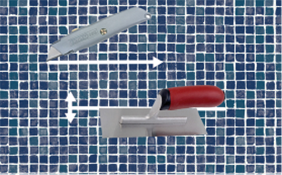
- Use a straight edge and level to help you align the tile as you work.
- Construct a grid on the substrate that is equal to nine sheets of the tile.
NOTE: Be sure to account for the spaces between each sheet of tile when measuring.
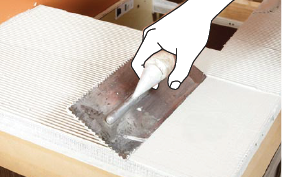
Applying Setting Material
- Mix setting material.
- First coat: apply setting material with the smooth edge of a trowel to a section no larger than one section of the grid.
- Second coat: create even ridges in the setting material by "combing" the material with the notched edge of the trowel.
Installing the Tile
- The sheets of mosaic have a clear tape covering on the front face of the tile. This allows the mosaic design to be seen during installation.
- Apply the backside of each sheet into the setting material, with the tape side face out.
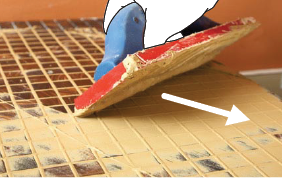
- Using a float tool, tap across the surface to adhere the mosaic securely into the setting material.
NOTE: The space between each sheet of tile should equal the space between each individual tile.
Securing Mosaic Sheets
- It is important to create a secure bond between the tiles and the setting material.
- Using the float tool tap across the surface to adhere the mosaic securely.
- This also ensures the final exposed plane of the mosaic is consistent and uniform in height.
Adjusting Spacing
- This can be a time consuming process, but is important to ensure a professional installation.
- Adjust while material is still wet.
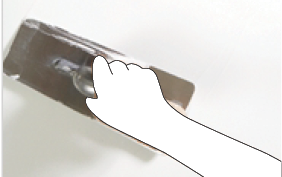
- Adjust any tiles that are uneven and ensure that all gaps are of equal width and height. Do this by cutting through the clear tape and moving tiles with a small trowel.
Grouting
- Grout can be applied to a clean, dry surface.
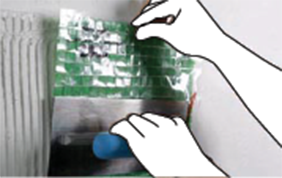
- Before applying grout be sure that the mosaic surface is clean and all clear tape is removed from the tiles.
- Peel tape in a diagonal motion.
- Thorough cleaning may involve removing excess setting material from the mosaic's joint with a knife, as well as cleaning off all dust and particles.
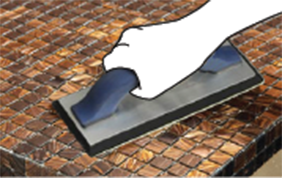
- Mix the grout and spread from the bottom up in a diagonal direction using a small trowel.
- Squeegee in the opposite direction.
Expansion Joints
Expansion joints should be installed at all "changes in plane" of the mosaic and where the mosaic meets an adjoining surface, such as in a corner. Fill these spaces with a silicone caulking sealant in place of grout to create expansion joints at these locations.
Cleaning
- The mosaic should be ready to be cleaned about 30-60 minutes after grouting.
- Before applying grout be sure that the mosaic surface is clean and all clear tape is removed from the tiles.
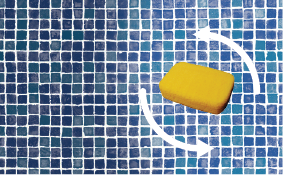
- Use a sponge and clean water and scrub in a circular motion, removing excess grout and smoothing all joints. Continue to wipe down the tiles until clean.
NOTE: Cleaning methods vary based upon the type of grout used in the installation. For example, a urethane grout must be cleaned earlier and more frequently that cementitious grout.


Installation for Stainless Steel Tiles / Mosaics
- Determine the pattern for your backsplash or countertop. While a pattern eliminates a lot of tile cutting makes the job easier, you can choose whatever layout you desire. Test fit a row of tiles in each direction to make sure that you are happy with the how the finished pattern will look.
- Mix the tile adhesive according to package instructions. The consistency should be like peanut butter. Some adhesives are ready to apply and do not require mixing.
- Apply a consistent layer of adhesive to a small area of the wall or countertop with the trowel. Prevent the adhesive from drying out by working in a small area. Form rows of ridges by dragging the notched side of the trowel through the layer of adhesive.
- Press the first tile into the adhesive. If desired, use the tile spacers to form consistent spaces between the tiles. You can also choose to set the tiles as close as possible if you do not like the look of grout lines with your stainless steel tiles. Repeat this process until all the whole tiles are installed.
- Cut all necessary tiles for edges and corners. Use a wet saw or an angle grinder. Protect your eyes, hands, and mouth from sharp metal edges and flying metal shards with safety glasses, gloves, and a dust mask. Cut with the finished side of the tiles facing up, and use a metal file or sandpaper to smooth the cut edges. Install the cut tiles using the same method you used with the whole tiles.
- Grout between the stainless steel tiles with a non-sanded grout or an acrylic caulk
Paper Face Mounted Sheets / Plastic Face Mounted
For Paper Mounted
After the tiles have been installed, to remove the paper, apply a moderately wet sponge to the paper, allowing the water to soak through and dissolve the glue. (Warm water dissolves quicker than cold). Paper should be wet for removal only at time that it will actually be removed. If paper is wet for removal, but then dries again without having been removed from the tile it is VERY difficult to remove upon wetting it again. Starting at the corners, peel the paper from the tile. If tile comes up during this process, allow setting material to set a little longer. Once paper is removed make any tile alignment adjustments while the setting material is fresh.
For Plastic Mounted
Once all film-mounted sheets are installed into setting material, creating small pinholes or slits in the film improves the breathing and setting up process. Once setting material has set up, remove the film by pulling it from the tile, starting at the corners and pulling downward. If tile comes up during this process, allow setting material to set longer. Once film is removed make any tile alignment adjustments while the setting material is fresh.
Grout
Grout Color
Grout color plays a major role in the final appearance of any glass mosaic tile job and should be selected carefully. Grout color that contrasts with the tile color tends to create a "frame" around each tile.
It is imperative to follow the manufacturer’s instructions for the products. If in doubt, please consult your tile installer or the dealer from which you purchased the setting materials. We make no representations as to the fitness for purpose of third party mortars and grouts.
Grouting
Grouting may be done after tile is firmly set approximately 24 hours after installation. Apply grout, unsanded, with a rubber float, making sure that grout joints are completely full and free of voids and pits. Clean the surface with a clean, damp sponge.
Allow grout to set firm or until haze forms on the tile and the grout in the joints sets firm. Use a soft, clean, dry cloth to polish off haze and remaining grout residue. Final cleaning of grout haze and tile polishing is done with clean, dry cheesecloth within 24 hours of grouting
These above installation methods are suggested and based on our own technical experiences. It is for your reference only. No warranty is implied. For best results, please hire a professional tile installer experienced in the application of glass mosaic tiles, porcelain mosaic tiles, or mother of pearl tiles.
Also, you can refer to an official glass tile installation instruction from the CTIOA (Ceramic Tile Institute of America). The following link provides you with CTIOA PORT 2002-4-25* http://www.ctioa.org/reports/fr93.html